Best practices for completing concrete pool interiors
by jason_cramp | March 29, 2017 8:30 am
By Michael Odorico
 [1]
[1]
Concrete pools are often referred to as the ‘Cadillac of pools,’ as their hardscaped natural look and feel is tough to duplicate and their cost is reflective of this. In fact, the price point to the consumer for a concrete pool is usually the highest in comparison to other pool types for several reasons.
The difference between a concrete inground pool and a vinyl or fibreglass pool is the entire shell (walls and floor) comprises 203 to 305 mm (8 to 12 in.) of concrete. The concrete is reinforced with a cage of rebar wired together in 254-mm (10-in.) squares, which provides structural strength to the tensile properties working against it.
Typically, there are four different application methods for building a concrete pool: shotcrete, gunite, formed or cast-in-place, and dry pack.
Shotcrete
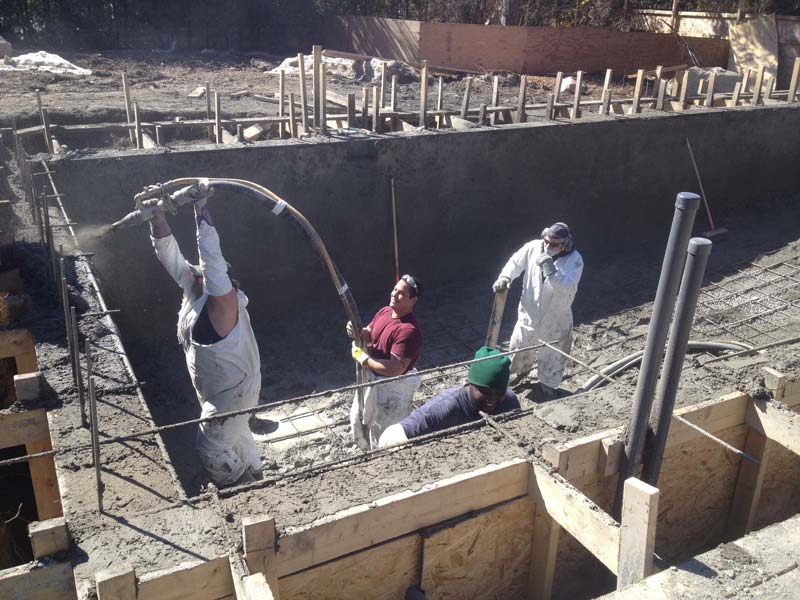
Shotcrete is a wet concrete mix delivered to the site by concrete truck. After loading the shotcrete pump, the concrete is conveyed through a hose at high velocity into the pool. Skilled workers then form and carve the shotcrete to create the pool shell.
Gunite
Gunite is a dry concrete mix comprised of sand and cement. Similar to shotcrete, it is conveyed through a hose at high velocity into the pool. Where it differs, however, is the sand and cement are shot dry through the hose with a separate water hose attachment at the nozzle. This enables workers to control the volume of water introduced to the mixture during application.
Formed or cast-in-place
This method involves using temporary moulds (usually wood panels) that are set firmly in place to construct the pool’s shape. The concrete is then conveyed by pump truck into the moulds and then vibrated to minimize voids in the concrete. The temporary moulds are removed 48 to 72 hours after concrete application. This method limits design options to square or rectangle pool shapes; however, there are now systems available which enable round moulds.
Dry pack
Dry pack involves using a fairly stiff concrete mix which is shovelled and packed in place by hand to create the pool shell. While this application method was widely used in the ’60s and ’70s, it is seldom used today as it is labour intensive and has a high degree of difficulty.
The finishes
 [2]
[2]Concrete pools require three components that tie into one another to create the unique look and feel: coping, waterline tile, and plaster finishes (e.g. marbelite [marcite], exposed quartz, and exposed pebble).
Pool coping
Pool coping is a material, typically a natural stone, brick, concrete, or tile that is placed level on the top horizontal part of the pool called the bond beam. Many builders usually prefer to use natural flagstone with a rock face or bullnose (rounded) edging with a 38-mm (1.5-in.) reveal overhanging into the pool.
When using flagstone coping, it is best to use a material with a consistent thickness to achieve the best cosmetic results. Also, it is important a 13-mm (0.5-in.) expansion joint is left where the coping and pool deck connect. This joint should be filled with silicone caulking, as it remains flexible for most of its lifetime. The purpose of this joint is to inhibit the pool deck, which expands and contracts during freeze-thaw cycles, from pushing the coping stone and potentially damaging it. The function of the silicone caulk is to provide a moisture repelling feature that, when properly applied, looks cosmetically pleasing as well.
Commercial indoor pools, such as hotels, gyms, or recreation centres, tend to gravitate towards using rounded-edge or bullnose-tile coping. Tile coping offers a softer feel which is regarded as being safer in a pool environment with higher bather loads. Depth markings are also integrated into the tile finish on the coping as safety is a top priority, especially when identifying water depth to bathers.
Waterline tile
 [3]
[3]All concrete pools require some sort of tile or stone edge vertical border around the top perimeter. There are hundreds of tile options to choose from, including: porcelain, slate, ceramic, granite, and glass. However, not all are advisable to use in certain regions where frost climates exist during winter months. Geographical regions where bitter winter frost exists (northeast Canada and U.S.) versus non-frost areas (southern and southwestern U.S.) highly dictate the type of tile that is commonly installed by pool builders in those regions.
The vertical perimeter tile waterline serves two purposes:
- Protecting the cement-based pool interior finish plaster (described later) that would be exposed to
air and susceptible to unsightly cracking and/or delamination when not constantly hydrated. - To display the high-end detail that defines the elegance and prestige of a concrete pool.
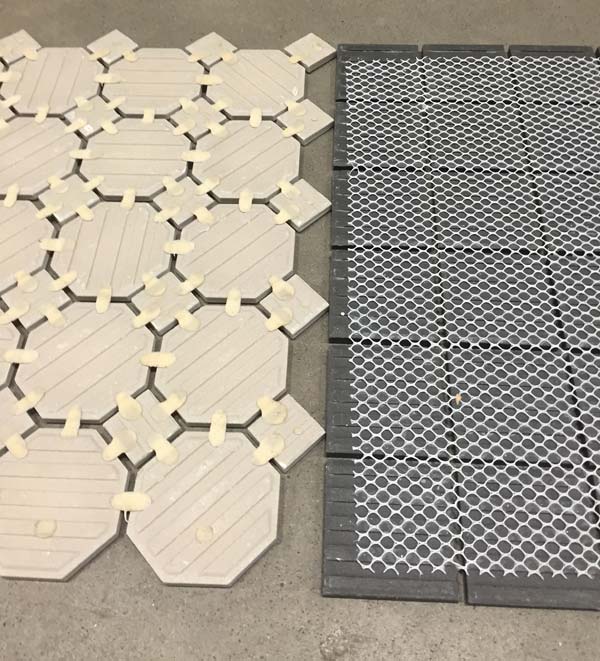
Frost can damage the pool’s tile and interior finish, more so if the wrong tile and tile depth are installed; therefore, it is important to note, tile depth, as a standard, should be installed a minimum of 305 mm (12 in.) down vertically from the top. The option of continuing the tile further down is possible and recommended, but not necessary if proper winterizing techniques are used. Consumers are limited in their options when living in regions with yearly seasonal freeze-thaw cycles. When selecting a mosaic tile, it is important it has silicone backing dots (not a mesh backing) to ensure better bonding and a longer life.
When installing a larger tile, the act of back-buttering is important. Back-buttering tile is the process of applying, by trowel, a thin-set adhesive to the back of the tile prior to installation. Once the substrate wall has been combed with thin set, the back-buttered tile can be installed. Applying a wet thin set to the back of the tile, and on the substrate, minimizes voids where water and frost can travel through, reducing the possibility of premature failure.
In contrast, pools installed in regions that do not experience these seasonal freeze-thaw cycles require a minimum tile depth of only 152 mm (6 in.) since the water level is not lowered during the winter. This also means consumers in these regions have a wider selection of tile options (see Figure 1 below) to choose from as they are not limited to choosing frost-proof tile.
Figure 1: Tile types |
||||||
|---|---|---|---|---|---|---|
| Region | Porcelain | Ceramic | Slate | Granite | Glass | Marble |
| Frost regions | X | — | — | X | X | — |
| Non-frost regions | X | X | X | X | X | X |
Thin-set adhesives
 [4]
[4]In any region, pool tiles should be adhered with latex modified thin-set adhesive to achieve the best results. Different adhesives should be used depending on the type of tiles being installed. For example, porcelain tile will require a different type of adhesive then glass tile. The manufacturer’s recommendations should always be followed when choosing adhesives as they are not all the same.
Tile grouts
When it comes to grout options, there are basically two types to choose from—cement or epoxy. Cement has been used for grouting pools for many decades and is described as the standard when pool tile is installed. It is economical to purchase and apply, and is still the most widely used for tile waterline on residential concrete pools.
Epoxy grout is a more durable option, however. This grout is waterproof and extremely resistant to chemicals. These added benefits come with a hefty price tag, as the materials and its application will often cost five to six times more than cement grout.
Commercial pools often have epoxy grout listed in the design specifications when the pool is being built due to its chemical resistance qualities.
Pool plaster finishes
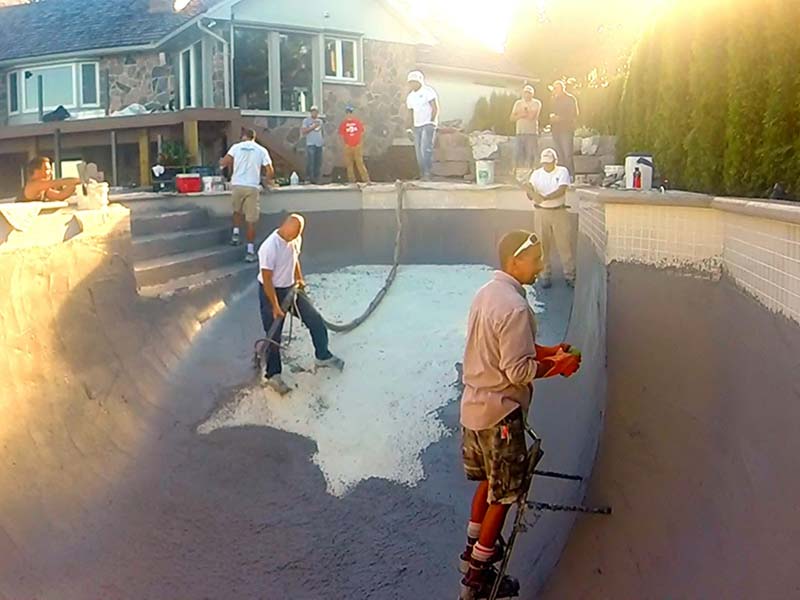
Pool plaster finishes are simply a mixture of cement, aggregate, and water that is applied to the pool substrate via trowel. Depending on the finish, the thickness of the application will vary between 9.5 and 19 mm (0.375 and 0.75 in.). It is applied by a team of skilled workers (between five to eight or more depending on the pool size). It is important not to be understaffed with qualified applicators during the process. If this happens, the likely result will be a pool finish where the aggregates are not compacted properly, making it more susceptible to chemical wear and tear. These finishes are applied in an uncontrolled environment of wind, sun, heat, cold, or potential rainfall; therefore, it is advantageous to erect a tent over top of the pool prior to application should weather be a concern.
As plaster finishes are constantly submerged in water it means they will be exposed to water conditions which vary over time, more so if the pool is improperly maintained. This unavoidable interaction between the pool finish and water will, over time, likely result in a change of its appearance. Therefore, maintaining balanced water will greatly increase the life of the pool surface. Poorly maintained water will cause the finish to deteriorate slowly, potentially causing unsightly discolouration, roughness or, in rare cases, compromise the finish.
Marbelite (marcite)
 [5]
[5] [6]
[6]Marbelite (marcite) is the most economical of pool finishes. Standard white marbelite is a simple mixture of two-part white marble dust aggregate, one-part white cement, and water mixed together in a mortar or drill mixer for a minimum of six minutes to a consistency of a thick milkshake.
This material is then applied to the pool substrate by hand or pneumatically sprayed by plaster pump to a thickness of 9.5 to 19 mm (0.375 and 0.75 in.). It is then trowelled to a smooth texture, smoother than 220 grit sand cloth. It is considered the smoothest of all other finishes and creates a crisp, clean baby-blue appearance. It is a reliable product when properly maintained and applied by a quality plaster company. Marble dust aggregate is characteristically soft in nature, so in an effort to strengthen the density and longevity of the product, silica (quartz) coloured aggregates can be used as a replacement for a percentage of the marble dust in the mix ratios to enhance its look and durability. The use of pozzolans and silicone chemistry additives can also be integrated into the mix for the purpose of reinforcing the cement and binding the aggregates together. These additives have been proven to help minimize problems with the pool finish caused by fluctuating water chemistry over long periods.
Coloured marbelite (marcite)
When adding pigments to white marbelite, many different shades can be achieved to satisfy the homeowner’s preferences. However, it is important to note, coloured marbelite finishes are naturally mottled (marbled) in appearance. Darker shades like black or grey have the greatest contrast to the white mottling, compared to lighter colour tones such as blue or teal; therefore, the client should be educated on this prior to the application. This way they know it is a normal product characteristic and not a deficiency. Many homeowners embrace the mottled effect, as it adds character to their backyard theme.
Quartz exposed finishes
 [7]
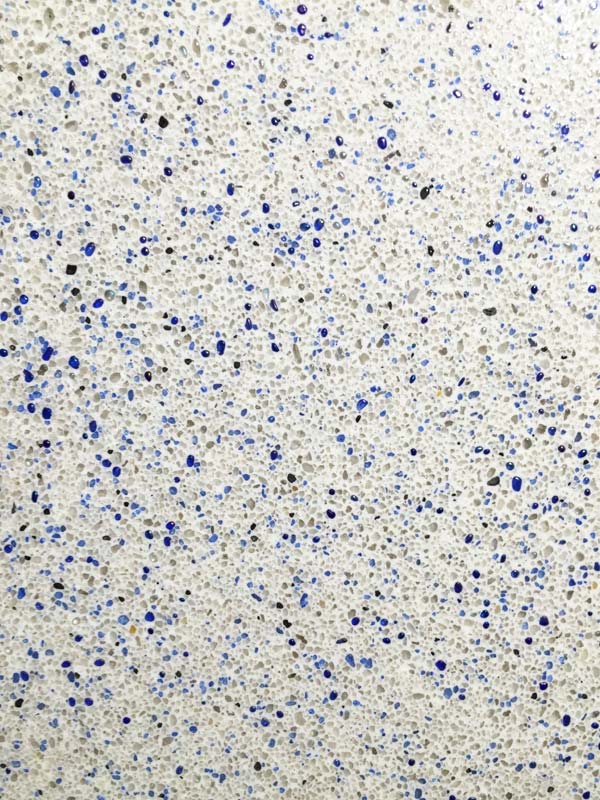
[7]Quartz finishes are similar to that of marbelite when it comes to how it is mixed and applied. That said, there are a few differences in terms of the type of aggregate used and the final steps of exposure to create a uniformly exposed durable, dynamic, quartz finish. Often referred as a commercial-grade finish option, exposed quartz is often specified for use in waterparks, gyms, hotels, and recreational centres because of its resistance to fluctuating water balances.
Many homeowners have been selecting this option for their pools because of its appearance and durability; however, it does not come without an increased cost. The advantages of an exposed quartz finish is that it comprises a durable 100 per cent quartz (silica), not marble dust aggregate and white cement, which is applied to the pool walls and floor at a thickness of 9.5 to 19 mm (0.375 and 0.75 in.) and trowelled smooth similar to marbelite finishes. The next step, after the product has hardened, is the exposure process which involves removing the paper-thin cement cream which was left at the top of the surface. The temperature during application will dictate when the exposure can begin, as premature exposure of the top cement cream in cooler temperatures will result in unsightly overexposed areas.
Types of exposure methods include water washing (with brushes and water the same day as it is applied), or acid washing the finish the next day. Water washing the same day will achieve the best consistent results compared to acid washing the finish the day after, once the cement cream has hardened.
The added advantage of exposed quartz is if the customer selects a coloured finish, mottling (marbling) is drastically reduced or eliminated since the cement cream that exhibits the mottling is removed.
Pebble exposed finishes
 [8]
[8]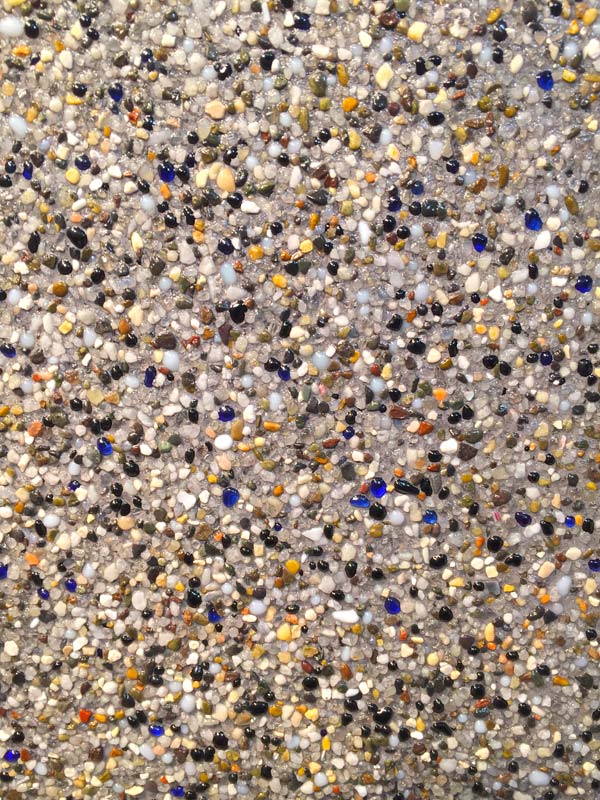 [9]
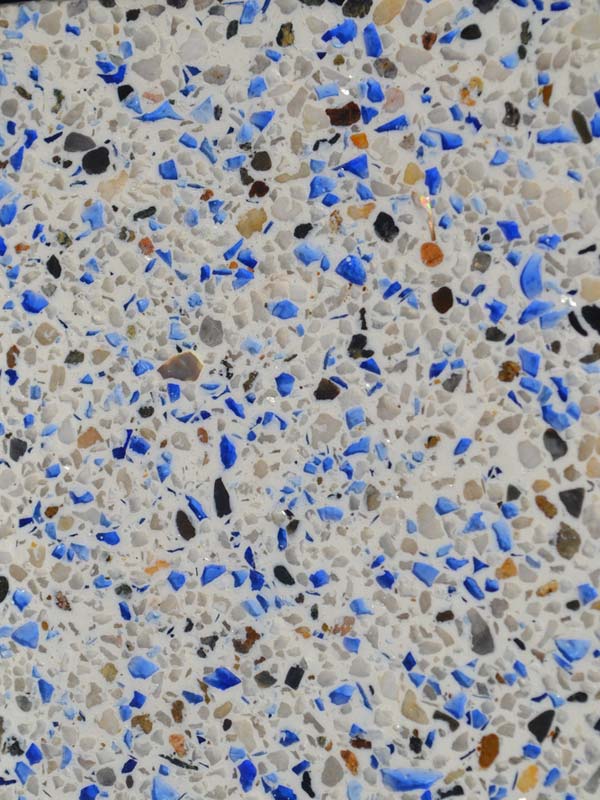
[9]Pebble exposed finishes are similar to that of exposed quartz in terms of removing the cement cream from the surface, thus exposing, in this case, small pebble aggregate rather than (quartz, silica) aggregate. Pebble aggregate ranges from large 2 to 3 mm (standard) to mini 1 to 2 mm in size and is mixed at a one-part pebble aggregate to one-part cement ratio. Since the aggregate is larger than the other finishes mentioned, it must be applied at a minimum of 13 to 25 mm (0.5 to 1 in.) thick for proper pebble compaction, resulting in a consistent finish when exposed.
Two different exposure methods can be used: water washing with brushes or water wands. Exposure techniques depend on how the plaster crew is trained to apply the particular pebble product they are using. The objective is to create the pebbles as close together as possible with the least amount of high spots to achieve an esthetically pleasing finish. Both exposure methods work well and achieve great results depending on the experience of the plaster crew. Pebble products are durable and more costly when compared to the other previously mentioned finishes.
Including glass bead accents in the pebble mixture adds more shimmer to the pool finish and is another option for the homeowner. When considering this pool finish, it is suggested the client feels the product’s dimpled texture. It is not as smooth as the other options due to its large aggregate size, and under extreme chemical fluctuations, even pebble surfaces will suffer deterioration.
Polished finishes
Simply stated, all of the aforementioned finishes can be polished to a smooth glass-like texture using wet polishing machines with special grinding disks. One advantage of this is the pool can be re-polished at a fraction of the cost of resurfacing later down the road.
Re-surfacing older concrete pools
New coping, tile, and plaster finishes can also be applied to older, existing concrete pools as part of a renovation project. The removal of the old tile and coping and the installation of new materials is an easy job for a seasoned concrete pool crew.
When it comes to re-plastering a pool using the options listed earlier, the following should be kept in mind if the old tile and coping are remaining.
- The pool should be drained completely and the hydrostatic valve or plug removed from the main drain.
- The old pool should be inspected for existing finishes such as paint or fibreglass. If either is evident, it needs to be grinded or sandblasted off the substrate completely. If there is no evidence of paint or fibreglass, proceed to the third step.
- The old existing plaster should be chipped (keyed) 76.2 to 152 mm (3 to 6 in.) below the waterline tile, around return fittings, and lights to achieve a transition that creates a flush watertight seal with the new plaster.
- The pool should be inspected for any delaminated (hollow) areas on old plaster and removed if any are found. Deep areas of delamination should be filled in with mortar mix and acrylic additive.
- The entire pool should be acid washed and neutralized with sodium bicarbonate once finished.
- Using a roller, broom, spray, or fine-notch trowel, a bonding coat should be applied and allowed to dry for a minimum of 24 hours.
- The plaster should be applied to the pool interior.
- The pool must be filled quickly to avoid shrinkage.
- The start-up procedures for plaster pools should be followed.
Homeowner education is important
Concrete pools can get be complex and pricey for the client when it comes to choosing the right finishes. Every homeowner’s needs are unique and their budgets differ whether they are having a new concrete pool installed or having an existing one renovated; therefore, it is important to explain all of these options. A reputable, experienced company will back their work after installation within product warranty guidelines. Contractors should educate their customers by stressing the consequences of a poorly maintained pool by comparing it to the consequences of never changing the oil in their brand new vehicle.
| Start-up procedures for plaster pools |
|---|
| The first 28 days after the application of a plaster finish is called the curing stage. Proper start-up procedures on newly plastered pools are crucial to the surface appearance and its integrity in the long-term.
High-quality sequestering agents should be added per manufacturer’s recommendations to minimize any metals in the fill water from coming out of solution to avoid permanently blemishing the pool finish. A good sequestering agent will also minimize calcium hydroxide (plaster dust) from emanating and adhering to the surface forming scale. Brushing the pool thoroughly twice a day until the plaster dust is no longer evident (usually 14 days), will significantly reduce scale and algae formation while the pool is not being chlorinated. A trained professional who is aware of these techniques should complete the start-up as he/she can oversee the process as it may be overwhelming for most homeowners. If the start-up procedures are not completed properly during the curing stage, it will likely result in problems such as discolouration or premature wear and tear in the future. The National Plaster Council (NPC), an association specifically for pool plasterers, builders, and service companies has published a list of these procedures, which can be found by visiting www.npc.online.org[10]. |
 [11]Michael Odorico is president of Leo Marbelite Inc., in Toronto. The company has completed various plaster pool finishes on more than 7000 pools in Ontario and abroad since it was established in 1989. Odorico has also been an active member of the National Plasterers Council (NPC) since 2006. He can be reached via e-mail at mike@leomarbelite.com[12].
- [Image]: http://poolspamarketing.com/wp-content/uploads/2017/03/shotcrete-action-shot-Photo.jpg
- [Image]: http://poolspamarketing.com/wp-content/uploads/2017/03/work-shot.jpg
- [Image]: http://poolspamarketing.com/wp-content/uploads/2017/03/Rockface-Coping-Stone.jpg
- [Image]: http://poolspamarketing.com/wp-content/uploads/2017/03/tile-comparison.jpg
- [Image]: http://poolspamarketing.com/wp-content/uploads/2017/03/Charcoal-Marbelite.jpg
- [Image]: http://poolspamarketing.com/wp-content/uploads/2017/03/White-Marbelite.jpg
- [Image]: http://poolspamarketing.com/wp-content/uploads/2017/03/Exposed-Blue-Quartz-Glass.jpg
- [Image]: http://poolspamarketing.com/wp-content/uploads/2017/03/Polished-Finish.jpg
- [Image]: http://poolspamarketing.com/wp-content/uploads/2017/03/Exposed-Pebble-Glass.jpg
- www.npc.online.org: http://www.npc.online.org
- [Image]: http://poolspamarketing.com/wp-content/uploads/2017/03/Odorico_Headshot.jpg
- mike@leomarbelite.com: mailto:mike@leomarbelite.com
Source URL: https://www.poolspamarketing.com/trade/best-practices-for-completing-concrete-pool-interiors/