Best practices for maintaining outdoor pool heating systems

by habiba_abudu | February 7, 2020 3:16 pm

By Tom Soukup

Electric, gas, and electronic components can easily get damaged or destroyed if they are not properly prepared as freezing water will expand and damage heat exchangers, piping, and internal controls. [1]
Electric, gas, and electronic components can easily get damaged or destroyed if they are not properly prepared as freezing water will expand and damage heat exchangers, piping, and internal controls.

If one lives and works in an area that experiences the severity of winter, chances are they already know the steps they need to take to prepare themselves for the season. Coats and scarves come out of the closets, and heavier blankets are placed on bedsides. Thermostats are turned on and tuned to keep the chill out of the air. Recipes for hot and hearty meals begin to come into rotation. Just as one would organize their home in preparation for the season, pool pros need to service and winterize pool heaters for the cold weather.

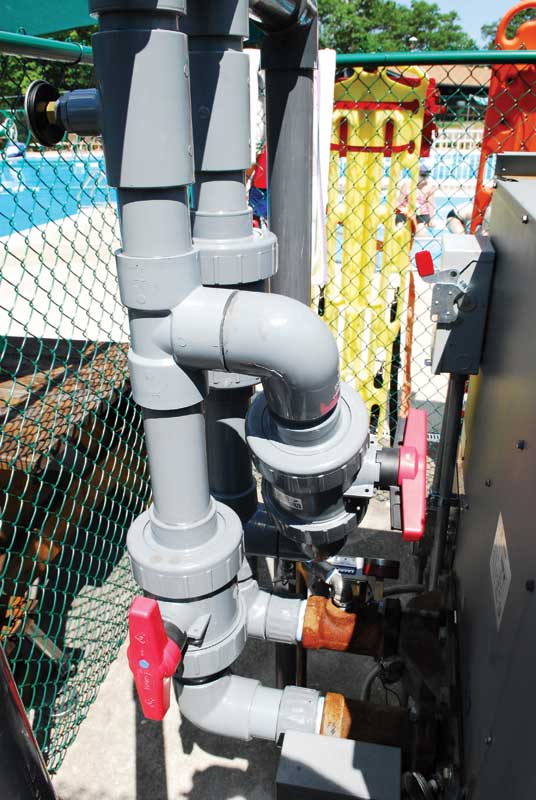
The same warm water that provides comfort during the summer can quickly turn into the enemy when temperatures drop. Electric, gas, and electronic components can easily get damaged or destroyed if they are not properly prepared as freezing water will expand and damage heat exchangers, piping, and internal controls. Therefore, it is important pool heaters are serviced and maintained so when it comes time to open again in the spring, the systems are operational and running.

Post-season system evaluation

Where applicable, technicians must isolate the heater from the rest of the system by disconnecting unions and/or removing true union ball valves.[2]
Where applicable, technicians must isolate the heater from the rest of the system by disconnecting unions and/or removing true union ball valves.

The winterization process can be likened to a post-season system evaluation. That said, a technician working on a heating system for the first time at a specific location may not be familiar with the previous maintenance team’s techniques. As the startup phase is critical, and most companies are busy during the summer months, certain inspections may often go unnoticed. This can cause technicians to run into issues during the winterization process, as key items on the checklist may have been overlooked initially. Therefore, to prevent such problems, service techs must keep a few things in mind.

  1. Consult equipment manual

The first place a technician should start when developing a winterization plan for their client’s aquatic heating systems is to consult the manufacturer’s manual and documentation. Most companies lay out specific guidelines on how the equipment should be winterized. If multiple brands are being used, they may require different techniques or steps to winterize that specific product. It is also useful to have a notebook or digital document where one can record the various makes and models of the equipment being used for quick reference.

  1. Make an assessment

It is also a good idea to assess how many heating units need to be winterized, and if there is proper storage space for all the components to be put away safely. This is especially important as it may be difficult to recommission heaters in the spring if the equipment is nowhere to be found. Also, providing the client with a record of what parts were removed for winterization and where they are located provides peace of mind for both parties. This preparation is key to getting the actual work started.

  1. Disconnect and store
One must ensure pipe seals and penetrations are weathertight.[3]
One must ensure pipe seals and penetrations are weathertight.

Where applicable, technicians must isolate the heater from the rest of the system by disconnecting unions and/or removing true union ball valves. All external equipment, such as pressure safety devices, flow switches, low water cut-offs, and external booster pumps, should be removed and stored in a location that is not subject to freezing temperatures. Service techs can even use masking tape to mark where the equipment came from and place it in an open crate, which is beneficial for air circulation: if any residual corrosive water remains, the parts do not baste all winter long.

  1. Turn off electrical supply

The electrical supply should be shut off first. One must also verify the power to any heater or heat pump is disconnected and turned off. Any other electrical devices on the equipment pad should be turned off, too. If possible, the relevant breakers in the circuit breaker must be turned off as well. Technicians can refer to the equipment’s manual to double-check. One must also consult regional, provincial, and local jurisdictions for licensing requirements when working on electrical systems. All applicable codes must be followed.

  1. Remove plugs carefully
A venting device—either external or internal—is present on all gas regulators. Technicians should ensure the vents are free and clear of ice and snow.[4]
A venting device—either external or internal—is present on all gas regulators. Technicians should ensure the vents are free and clear of ice and snow.

Next, water from the heater and heat pumps should be removed. This is relatively easy as most systems have drain plugs and/or valves. On average, one should find around two-to-four plugs, depending on the manufacturer. The documentation will further allow easy identification and access to those drain points. These plugs, or drain cocks, come in two variations: plastic and brass. If the plugs are made of brass, technicians must take special care when removing them as the threads are delicate, and one may run the risk of stripping these or breaking the plug entirely.

  1. Blow dry remaining moisture

Once the water has been drained from the system, service techs should blow-dry any remaining moisture. Specialized blower units with hoses are designed specifically for this task and can be found at most supply houses or online vendors. If one does not have access to such a device, a normal air compressor or low-pressure shop vacuum will do just fine. High pressure can easily damage the equipment’s internal mechanism; therefore, low-pressure devices are recommended.

  1. Use the closest access point
Service techs should perform a post-season inspection of parts that have been removed and check for any wear and tear as well as clogging from mineral buildups. [5]
Service techs should perform a post-season inspection of parts that have been removed and check for any wear and tear as well as clogging from mineral buildups.

If the heater is not isolated from the rest of the system, one must be extra cautious as it is not recommended to blow air through the air filter to reach the equipment. If the device cannot be isolated, service techs should come to the closest access point to the heater and use the blower or compressor from that point. Typically, most water will exit the system within a couple of minutes, but to be sure, one can run air through the system for five-to-seven minutes.

  1. Inspect for any signs of disrepair

It is good practice to thoroughly inspect for water infiltration into disconnects, breaker boxes, timers, junction boxes, and equipment connections. Service techs should also watch for any signs of rust, oxidation of terminals, or dried water trails if there is no obvious evidence of water. Again, this is a double-sided inspection and helps plan for spring startups as one can find and fix any such issues prior to when the heater starts operating in the summer. Also, if on-site maintenance staff or an electrical contractor need to be notified of any major repairs or replacements, this is the appropriate time to do so as it will provide ample time for servicing.

  1. Protect gas systems

Besides winterizing the water side of the system, it is also crucial to protect the gas device. Service techs must conduct a thorough inspection and check on the regulators, gas valves, and anything else pertaining to the equipment. One should also turn off the pilot flame, main gas valve, and gas supply to the heater. Just like the electrical devices, technicians must check local jurisdictions for licensing requirements when working on fuel gas systems. All applicable codes must be followed. Most jurisdictions will allow service techs to cap open pipes if the regulator is removed.

A venting device—either external or internal—is present on all gas regulators. Technicians should ensure the vents are free and clear of ice and snow. Some devices may have regulators in tricky spots and may need to be removed completely as a few drops of water inside a regulator will cause failure.


  1. Verify overall integrity of items
It is good practice to thoroughly check for water infiltration into disconnects, breaker boxes, timers, junction boxes, and equipment connections. One must keep an eye for any signs of rust, oxidation of terminals, or dried water trails if there is no obvious evidence of water.[6]
It is good practice to thoroughly check for water infiltration into disconnects, breaker boxes, timers, junction boxes, and equipment connections. One must keep an eye for any signs of rust, oxidation of terminals, or dried water trails if there is no obvious evidence of water.

At this stage, it is a good idea to review with the customer or pool owner about what parts should be replaced next season. Pool pros should approach winterization as a ‘double-duty task,’ which can help them plan for the spring startup phase. One must inspect the parts that are removed, check for any wear and tear, as well as clogging from mineral buildups. The goal is to verify the overall integrity of the items one will be storing and reusing later.

Technicians should also perform a post-season inspection of the burners, gas system, and piping. These checks may seem tedious, but they are just as important as taking care of the equipment. This process also allows the customer to budget appropriately for the following season if replacement parts and labour are needed. It also provides ample time for the installer/technician to source parts and prepare a schedule for their client.

Winterizing the heating system for a pool not only ensures an extended life of the equipment, but also places pool pros in a position to make assessments and educated recommendations to their clients when the spring season approaches. Even with a large workload and multiple sites to visit before the cold weather sets in, these processes can set a technician apart from the rest of the pack. Further, communication and planning builds customers’ trust and ensures a lasting, positive relationship.

[7]Tom Soukup is the principal and chief designer for Patriot Pool Heating, serving eastern Pennsylvania in the United States. With more than 15 years of experience in the hydronic heating industry, he brings his knowledge of high-efficiency boilers and designs to the pool industry. Soukup is also an active member of the Penn Jersey chapter of the Northeast Spa & Pool Association (NESPA). He can be reached via email at twsoukup@patriotpoolheating.com.

Endnotes:
  1. [Image]: https://www.poolspamarketing.com/wp-content/uploads/2020/02/secure-covers.jpg
  2. [Image]: https://www.poolspamarketing.com/wp-content/uploads/2020/02/exposed-valves.jpg
  3. [Image]: https://www.poolspamarketing.com/wp-content/uploads/2020/02/pipe-seals.jpg
  4. [Image]: https://www.poolspamarketing.com/wp-content/uploads/2020/02/gas-regulator-vent.jpg
  5. [Image]: https://www.poolspamarketing.com/wp-content/uploads/2020/02/valve-bolt.jpg
  6. [Image]: https://www.poolspamarketing.com/wp-content/uploads/2020/02/water-in-electrical-supply.jpg
  7. [Image]: https://www.poolspamarketing.com/wp-content/uploads/2020/02/TomSoukup.jpg

Source URL: https://www.poolspamarketing.com/trade/features/best-practices-for-maintaining-outdoor-pool-heating-systems/